Featured

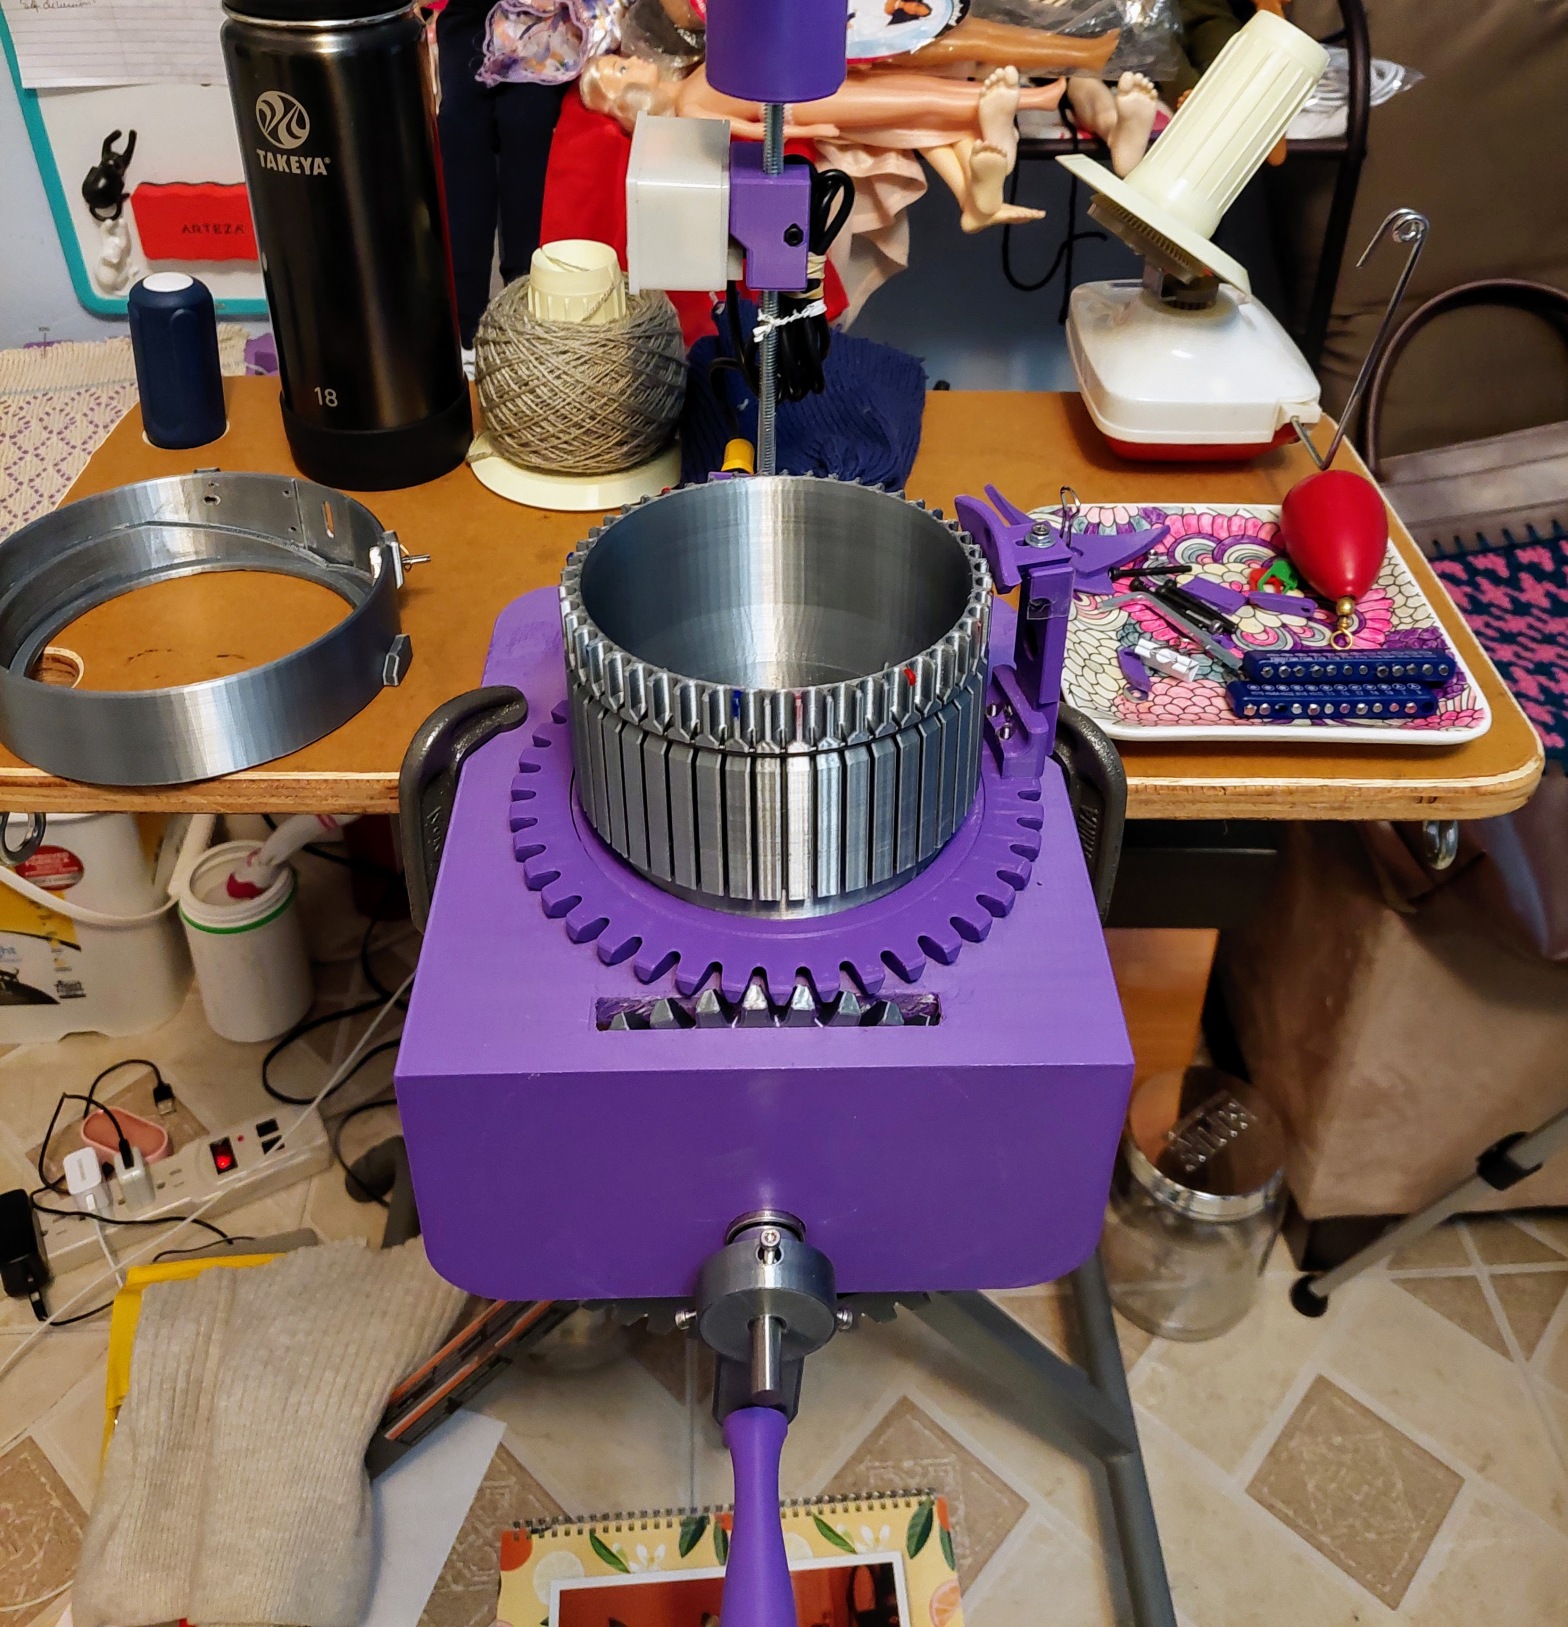
Máquina tejedora circular de calcetas creada en impresora 3D

Uno de los primeros videos que publiqué cuando recién empecé mi canal en YouTube fue un tutorial de máquinas tejedoras circulares para hacer calcetas. Aunque aprendí a tejer a dos agujas y en crochet (ganchillo) cuando era muy pequeña, no me obsesioné con estas manualidades hasta que me mudé a los Estados Unidos, ya hace casi 20 años. Cuando recién tenía ocho años tejía en lo que aquí llamamos “free form”, o forma libre, no instrucciones, no patrones, no diseños, solo debía mirar a la persona y podía crear una prenda. El problema es que los tejidos no simepre salían bien. Las técnicas de tejido las aprendí en inglés y mi cabeza se partió en dos. La Helen tejedora angloparlante y la Helen tejedora hispanoparlante.

Por eso cuando publiqué mi primer video no tenía ni la menor idea del lío en que me estaba metiendo. La pequeña maquinita que mostré, era una réplica de las máquinas creadas a mediados de los años 1800 por un inventor francés que vivía en Inglaterra en la era victoriana. Estas máquinas nunca llegaron a Latinoamérica, Asia o Africa. La mayoría se mercadearon en Norte América, Nueva Zelanda, Australia y los territorios ocupados por Inglaterra y se dejaron de producir en los años 40.

No pensé que alguien vería mis videos, ya que el tema de las máquinas tejedoras no es muy conocido y la mayoría de máquinas de cama plana se dejaron de producir a principios de 2000. Pero pronto empecé a recibir comentarios de personas que vieron mi video y estaban interesados en comprar una de estas máquinas. Aunque en los videos explico que no las vendo, y aunque paré de hacer videos de esta máquina, me siguen preguntando.

Hace algunos meses leí un artículo sobre impresoras 3D. Así que decidí comprar mi impresora 3D. Fue difícil porque la máquina llega desarmada y uno la tiene que armar. También fue duro aprender a usarla. Y, si uno quiere Imprimir diseños originales, debe aprender diferentes tipos de programas para crear modelos en 3D.

Descubrí un sitio llamado Thingiverse en dónde diseñadores de 3D publican sus diseños gratis. Allí encontré un diseño inspirado en las máquinas vintage metálicas, exactamente como las que yo tengo. El diseñador es MrRoboto19 (Steve Turner). El tipo es maravilloso y su diseño es fantástico.

Después de mucho investigar y mucho trabajo, logré imprimir mi MrRoboto tejedora. Aunque nunca va a alcanzar el nivel de una máquina de metal, trabaja muy bien, mejor de lo que esperaba.

Aquí les dejo el video que publiqué en mi canal YouTube, en el que demuestro el proceso de creación y uso de esta máquina.

Actualmente, estoy aprendiendo diferentes programs de modelado en 3D y espero algún día poder diseñar mi propia máquina, pero sé que tomará tiempo.

No solo me han escrito, preguntando por estas máquinas, desde México, Argentina, Chile, Puerto Rico, Perú, sino que también de Alemania, Brasil y de mi propio país, Estados Unidos. Esta es una gran opción para los que no tienen acceso a este tipo de máquinas.

Nota: No estoy afiliada a ninguna de las compañías y sitios que menciono y en mi blog y mis videos. Tampoco recibo pagos de ninguno de estos lugares. Si deciden contactar sus servicios, lo hacen bajo su propio riesgo.

My 3D-Printed CSM

A few years ago I posted a couple of YouTube videos of my new Erlbacher circular sock machine (CSM). I just got it and I was sooo excited. I posted the videos both in English and Spanish. However, I started getting a lot of comments from Latin American viewers asking me where they could buy a CSM. Some of them even asked me for an estimate and where they could send the payments.

I was taken aback! I live in the U.S. and didn’t realize that these machines were never marketed in Latin America. I didn’t know what to answer. I emailed some of the few companies that still sell CSMs and asked if they didn’t mind if I mentioned their companies in my YouTube videos. Most of them didn’t answer, I guess it is because it is hard to ship to this part of the world.

So, six months ago I read an article about 3D printers, and I wondered if it was possible to 3D print a CSM. And me being me, decided to jump in head first and ordered a 3D printer. Needles to say it wasn’t nearly as easy as I thought.

Creality Ender 5 Pro

First, I had to assemble the darn thing. I watch several YouTube videos in order to accomplish this. Second I had to make it work! I learned the hard way that 3D printers don’t work at all like regular paper printers, my bad. And third, I had to learn how to use the software.

I won’t go into detail of the ordeal I went through to get the three aforementioned steps done. Suffice it to say that, somehow—I still don’t know how—I made it work. After that, I had to figure out how to make sure the objects printed the correct way.

Three months later, I was able to assemble my first 3D printed CSM. I found the model in Thingiverse, a website were people post free 3D model for not commercial use. This particular machine was designed by a German guy, so I copied the description into Google Translate and finally understood what it said. I was elated; I thought it was the most incredible thing I’ve ever done in my life! However, it looked pretty, but I couldn’t knit a sock to save my life.

This model uses regular 4mm flat bed knitting needles. I used Knitmaster, Singer or Studio knitting machine needles, which are a little bit shorter than Brother’s. I tried using Brother needles but they didn’t work. This is an 80 needle cylinder and the extra tail of the needles must be cut off to make them fit.

Sock knitting machine RSM2 by difl, Thingiverse

I kept trying and testing, I was adamant to make it work. I spent a lot of money in hardware and all kinds of needles. Finally I could knit a tube; it wasn’t pretty, but it knitted. I am lucky enough to own two metal CSMs and they are a pleasure to work with, however, my little PLA CSM was more a torture than a pleasure.

Some of the problems I encountered when printing and assembling this model were: The base is flimsy and the brown one broke in half (I gorilla taped it). It isn’t easy to affix the machine to a table and often comes off, which can cause injuries. The crank wheel and handle are too small, so in order to get one revolution you must crank the wheel about two times. There is no place to install a row counter.

That being said, I think it is fantastic considering the designer isn’t a knitter and didn’t have an example. It looks like he came up with the idea on his own. Unfortunately after three or four knitted tubes, the partitions between the needles started to break and cause the needles to jam.

3D Printed CSM Knitted Tube

Nevertheless, I had to keep trying since the vintage beautiful metal machines are not accessible to Spanish speaking countries. I wanted to give my viewers an option. I kept researching Thingiverse and I found the files to print a CSM inspired on the vintage Legare CSM. The designer is MrRoboto19, his name is Steve Turner. He blew my mind away. The model resembled not only the Legare CSM, but also the Auto Knitter—I own one, probably circa 1940s. It took me three weeks to print all the parts, and another two to assemble the machine. The design was extremely well made.

I am a crafter, but I don’t know anything about hardware, screws, springs and so on. The machine assembly called for many of these things and it was a literal nightmare. Granted, MrRoboto19 wrote a warning about this saying that, if you were not good with hardware, this project wasn’t for you. Of course, I paid no head to his warnings. I ended up with two medium boxes of screws, washers, tools and various hardware that I don’t know what to do with.

I finally managed to assemble the CSM and, IT DIDN’T WORK! I couldn’t believe it, after all that work. Two things happened: There are two fin like pieces that go inside the cam shell (picture below), which allow the needles to go up an down and create the heel and toes of the sock. In order for the fins to work a torsion spring must be placed on each of them so they lift and go back to their original position after the needle buts have passed underneath.

Erlbacher Metal Fins. I installed them backwards!!!
Torsion Springs Improvised by Me

The needles were also a problem, I used my Erlbacher’s needles (These needles are specifically for CSMs and don’t work on flat bed knitting machines), and they didn’t go far down enough to create the stitches, they came out too tight, the stitches crawled up to the top of the needles and dropped. I discovered that the Erlbacher’s needles (inspired on the vintage Gearhart CSM) where slightly taller than the Auto Knitter’s, so I swapped the needles and they worked, I could knit a tube.

I also ordered metal fins from Erlbacher (great customer service), and after some tries, they worked great. MrRoboto19 specifies the type of needles that should be used with this model, other needles won’t work.

In conclusion, if you have no access to any of the CSMs available in the market, you may 3D print your own. It will work, but never at the level of the metal ones. Nonetheless, this one worked pretty well.

Below are three videos I posted in my YouTube channel. On these videos I describe the process to create socks in a MrRoboto CSM.

I am learning how to use Fuse 360 which is a more advanced software than programs like Tinkercad and 3D Builder. I model the object and then slice it in Ultimaker Cura to finally print it with my Ender 5 Pro. I can’t model complex objects yet, but I am getting better, and after I master this skill, I hope to be able to design my own knitting machine or loom. But it won’t happen any time soon, I still have a lot to learn.

Disclaimer: I am not endorsing any of the websites and products mentioned on this article or any of my articles. I am merely referencing the tools I use to create my crafts. If you decide to buy/use any of these products, do it at your own risk.

Brother Ribber KR-830

One of the most important types of knitting is ribbing. Ribbing is used to create elastics for knitted garments. As a hand knitter, I never had the need to learn how to rib on a knitting machine, although I own several knitting machines, I used to knit cuffs, collars and waistbands by hand and then mount the stitches on the machines. Unfortunately, I ended up with a herniated disc after injuring myself at the gym. As a result, I slowed down my handknitting because it became very painful.

On one of my first posts on this blog, I told the story of how I came in possession of my first knitting machine. I bought craft leftovers from a friend, which consisted in one Brother KM (knitting machine), one ribber, pattern books and knitting manuals. The KM is long gone, but I kept the ribber and it took me 10 years to gather the courage to learn how to use it. It took me long enough, huh?

I was desperate to knit again because I am addicted to knitting, but I didn’t see how I could mange the ribbing part. Then I remember that I had a ribber gathering dust somewhere in my basement. I ran to the basement and unpacked a very dirty Brother ribber. I decided to give it a second chance.

According to the manual, the ribber was bought in 1971 (the date was handwritten by the original owner). And I thought, Hmm, this machine is too old, I don’t think it will work. But, oh boy I was mistaken. I cleaned the old thing and attached it to my 1980s electronic Brother KH-900. And…It worked

Here is the video I just posted on YouTube.

Oldie Brother Ribber with Younger Brother KM

I am so happy I never got rid of the ribber and that I decided to face my fears and learn how to use it. It is an incredible well made machine, built to last. So if you are thinking about learning how to use a ribber, let me tell you that you won’t regret it. Challenge yourself to do it and let’s keep knitting machines alive!

Como usar la cama auxiliar Brother KR-830 para tejido elástico

Uno de los tipos de tejidos más útiles es el tejido elástico. Desafortunademante, este tipo de tejido es fácil de hacer cuando se teje a dos agujas pero no cuando se teje en máquina tejedora o tricotosa. La única forma de crear este tejido en máquina tejedora es comprando un accesorio adicional. Este accesorio se parece mucho a la máquina tejedora princial pero la diferencia es que las agujas trabajan verticalmente en lugar de horizontalmente. Si no se tiene este accesorio se debe trabajar el tejido elástico a mano ya sea con dos agujas o deshaciendo puntadas alternas y luego tejiéndolas a mano, lo que no es muy práctico.

Antes de lastimarme una vértebra, esto no me preocupaba porque tomaba mis dos agujas y tejía un tejido elástico rápidamente mientras veía televisión. Después de lastimarme, tejer me causaba mucho dolor así que empecé a coleccionar mis preciosas máquinas tejedoras. Pero me sentía terriblemente frustrada de no poder hacer los tejidos elásticos en la tricotosa. Tejía los elásticos para cinturas, puños y cuellos de mis prendas muy despacio, a mano y luego montaba las puntadas en las agujas de la máquina. Esto no es ni muy rápido ni muy productivo.

Creo que en otras publicaciones en mi blog explico como conseguí mi primera máquina tejedora. El accesorio (ribber) para hacer tejido elástico venía con el primer lote de piezas que adquirí, pero no tenía ni la menor idea de que era. Hasta ahora, depués de casi 10 años, decidí finalmente probar la cama auxiliar. La verdad es que me asustaba. El reulstado fue increíble. Seguí los pasos del manual al pie de la letra y para mi sorpresa, tejí mi primer elástico en 10 minutos.

Acabo de publicar el video de instrucción de como usar este accesorio. Lamento mucho haberme tardado tanto en descubrirlo.

Aquí les dejo el video.

Estoy buscando las camas auxiliares para mis dos máquinas Singer. Espero conseguirlas y publicar un video de como usarlas. Creo que no volveré a hacer mis elásticos a mano, aunque adoro tejer, como dije antes, me produce mucho dolor y no puedo dejar de tejer porque soy adicta. Así que mi cama auxiliar Brother viejita de 1971, trabaja perfectamente bien, estas máquinas fueron hechas para durar para siempre.

Así que si están pensando en aprender a usar la cama auxiliar, déjenme decirles que no lo van a lamentar. Avíentense y disfrútenlo. Y…a tejer se ha dicho.

WHERE TO BUY A HOME KNITTER

Since I started posting videos in YouTube, I have received several comments requesting me to publish the names of the companies where I buy my home knitters. However, very few companies still produce them. Most companies are focused in producing high volume, industrial knitting machines.

Lee en español

Unfortunately, by the end of the 80s, the interest in these amazing craft items has dwindled considerably. I remember getting a Bond America Ultimate Sweater Machine (USM) for my birthday. That’s what I asked my husband to give me; I saw it at a Michael’s store and I had to have it. That must’ve been around 2005. Since then, the only home knitters available are plastic mid-gauge circular knitting machines, made in China, and produced, for the most part, for children.

In one of my previous posts I explained how I ended up collecting knitting machines. The first one I got was a Brother from 1975, for which I paid only $50.00 (including books and accessories). If I wouldn’t have bought it, it would have ended up in a thrift store, or worse, in the dumpster.

I have acquired most of my knitters (about 15) from eBay. I consider myself a collector, so my videos are mostly aimed to people, who like me, collect these machines. That being said, I would like to clarify that I don’t sell knitting machines, and that, so far, I don’t receive any money for advertising.

So, as promised, below I include a list of the knitters that are still in production and the companies that distribute them (to the best of my knowledge). The rest, can only be found on, eBay, Facebook Marketplace, Facebook private groups and Mercado Libre for Latin America.

Studio Mod. 360 Punch Card Knitting Machine

Circular Sock Knitting Machines (CSKM or CSM)

Here’s a link to the list published by the Circular Sock Knitting Machine Society: https://cskms.org/resources/where-to-find-a-csm/

Mid-Gauge Plastic Circular Knitting Machines

Flat Bed Home Knitters

Computerized Digital Knitting Machines

Although, Kniterate isn’t considered an industrial knitting machine, it isn’t a home knitter either. It costs about US$10,000 and it is produced for clothing designers who want to reduce production time.

The only two machines I bought new are an Earlbacher Speedster CSKM, and a plastic flat bed Silver Reed LK-150. I bought the rest mostly on eBay, some on Etsy, and one (my favorite one) on Facebook Marketplace. They shipped from different countries like, Canada, UK, and Russia. I make sure I also buy old machines for parts, because I know these machines are not being produced any longer, and if they break, I will not only cry for an entire year, but also, I won’t be able to get them back.

I hope this information is useful. I tried my best to make it easy to follow. Good luck in your search for your next best friend, a home knitter. If you know of any other company that produces new home knitters, please feel free to leave a comment, so I can share the wealth. In the meantime, make sure to check may YouTube videos. Happy knitting! https://www.youtube.com/c/HelenSiersKnittingfingers

Until next time…my knitting friends.

DÓNDE COMPRAR TEJEDORAS O TRICOTOSAS CASERAS

Read in English

Desde que empecé a publicar videos en YouTube, he recibido muchos comentarios pidiéndome que publique los nombres de las compañías en dónde compro mis máquinas tejedoras. Sin embargo, muy pocas compañías continúan produciendo tejedoras caseras. La mayoría de compañías se enfocan en producir tejedoras industriales de alto volumen.

Desafortunadamente, desde finales de los ochenta, el interés en estos maravillosos artefactos de manualidades, ha bajado considerablemente. Recuerdo cuando obtuve una tejedora casera para mi cumpleaños. Le pedí a mi esposo que me la regalara, la vi en la tienda Michael’s (es una tienda de manualidades en los Estados Unidos), y supe que tenía que poseerla. Esto fue alrededor del 2005. Desde entonces, las únicas máquinas disponibles son las máquinas plásticas circulares de puntada mediana, normalmente fabricadas para niños.

En una de mis publicaciones previas (en inglés), expliqué como terminé coleccionando tejedoras. La primera que obtuve fue una Brother hecha en 1975, por la que pagué US$50.00 (incluyendo manuales y accesorios). Si no la hubiese comprado, hubiese terminado en una tienda de segunda mano, o peor aún, en la basura.

Adquirí la mayoría de mis tejedoras (unas 15) en eBay. Me considero una collecionista, así que mis videos son creados para persona que, como yo, coleccionan estas máquinas. Dicho esto, me gustaría aclarar que no vendo tejedoras y que, hasta ahora, no he recibido dinero por comerciales.

Así que como lo prometí, abajo les dejo una lista de las tejedoras caseras que todavía se producen, y las compañías que las distribuyen (hasta donde you sé). El resto, solo se encuentran en eBay, Facebook Marketplace, grupos privados de Facebook y en el Mercado Libre, en el caso de Latinoamérica.

Tejedora Studio modelo 360 con mecanismo de tarjeta perforada

Tejedoras circulares de calcetines (CSKM or CSM por sus siglas en inglés)

Desafortunadamente, las tejedoras circulares de calcetines nunca se vendieron en Latinoamérica. He sabido, por algunos de mis seguidores de YouTube, que llegaron a Argentina y Chile, pero no se comercializaron formalmente.

Abajo está el enlace de la lista publicada por la Circular Sock Knitting Machine Society [Sociedad de máquinas circulares de calcetines]: https://cskms.org/resources/where-to-find-a-csm/

Tejedoras circulares plásticas de puntada mediana

  • Addi Circular Knitting Machines (Alemania): Distribuídas por Amazon, eBay y Etsy
  • Prym Knittingmill Maxy: https://www.prym.com/en/knitting-mill-maxi-624170. También distribuídas por Amazon, eBay y Etsy
  • Loops and Threads Knit Quick: Michael’s, eBay y Amazon

Tejedoras de cama plana

Tejedoras digitales computarizadas

Aunque Kniterate no es considerada una máquina industrial, tampoco es una tejedora casera. Su costo es de unos US$10,000.00 más o menos, y es producida para diseñadores de ropa que desean reducir el tiempo de producción.

Las únicas dos tejedoras que compré nuevas fueron, mi tejedora de calcetinas, Earlbacher Speedster CSKM; y mi tejedora plástica de cama plana, LK-150. El resto las compré principalmente en eBay, algunas en Etsy, y una (mi favorita) en Facebook Marketplace. Todas fueron envidas desde diferentes países como, Canadá, El Reino Unido de la Gran Bretaña y Rusia. También me aseguro de comprar máquinas viejas por partes, porque sé que estas máquinas ya no se fabrican, y si se rompen, no solo lloraré por un año, sino que no podré recuperarlas.

Espero que esta información les sea de utilidad. Traté de hacerlo lo más fácil de entender posible. Buena suerte en la búsqueda de su próxima mejor amiga, la tejedora casera. Si saben de alguna otra compañía que fabrique tejedoras, por favor, escriban la información en los comentarios para que la pueda compartir. Y no olviden ver mis videos en YouTube. ¡Disfruten tejiendo! https://www.youtube.com/c/HelenSiersKnittingfingers

Hasta la próxima…mis amigos tejedores.

For The Love of All That is Crafty

I learned to crochet when a I was eight years old and to knit when I was twelve. I kept doing both for the most part, with some hiatus in between. However, it wasn’t until my daughter was a toddler that I fully embraced these crafts. At that time I was a single mother, working a full-time job and my daughter was three years old. To say that I was stressed, it’s an understatement. In order to keep myself sane, I started knitting and crocheting again. After about five years I discovered the first knitting machine at Michael’s, the famous Ultimate Sweater Machine. My husband (I remarried) gave it to me for my birthday. The machine was great at the beginning, but it became limiting after I realized I could create more complex pieces through hand knitting.

A few years later a co-worker’s grandmother passed away and she didn’t know what to do with her grandmother’s large knitting collection. She sold everything to me for $50.00. The knitting machine included in the bundle, a 1977 Brother punch card, didn’t quite work. The punch card mechanism was damaged and I didn’t have the slightest clue of how to fix it. I sold it on eBay for parts and kept the ribber and the accessories, which I still have.

I decided to start a blog because I wanted to share my passion for crafts–specially yarn crafts. I wrote a couple of posts and forgot about it. After I created my Knitting Machine Tutorial YouTube Channel, in Spanish, I realized that there wasn’t much information about knitting machines for Spanish speakers, and my followers had many questions.

So far I don’t profit from neither my blog nor my YouTube channel. That might change in the future, I’m not sure yet. I’ll wait to see what the future has in store for me.

I’m still on the fence of deciding if I would use this blog to post both English and Spanish content, since my follower base has more Spanish speakers than English ones. I also have viewers from Brazil, Germany and the UK.

In the meantime, I will keep doing this for the love of all things crafty, after all, the sky is the limit!!!

Passap Duomatic 80 Knitting Machine

Dear fellow knitters,

I have achieved another step in my knitting machine journey. Two months ago I stumbled upon a Passap Duomatic 80 knitting machine. I have always heard knitters refer to this machine as the “Cadillac” of knitting machines. So, I had to see for myself.

When I was very young, about 5 years old, my mother—a single mother with 4 children who was always trying to figure out how to support them—bought a humongous knitting machine or so it seemed to me at the time because I was so little. This was the first time I saw a knitting machine. I vividly remember reading the word “Passap” on it. She assembled the contraption in the garage (since we didn’t own a car) and off she went. She made dresses and sweaters for sale. I used to sit on the floor to watch her work for hours. So, when I saw this machine for sale  I couldn’t miss the opportunity.

I usually buy my used knitting machines on eBay, but I found this one on Facebook. The nice lady who sold it to me told me she bought it from a friend many years ago, but never learned how to use it. Therefore, she decided to keep her Brothers and sell the Passap. Now I know why. This is the most intimidating looking machine I’ve ever seen!


I think my mom had the Passap E600 which is an electronic machine, white and sleek. The Duo (like everyone calls it) has ugly dark green carriages and a heavy double bed shaped like a triangle. With the machine I got a lot of manuals, pattern books, and attachments but no instructions on how to assemble the monstrosity.  I finally found the original YouTube video from the 80’s that showed how to assemble it. I could barely hear what the guy was saying, but finally, with the help of my husband, we put it together.

After that, I spent time reading all the manuals and watching YouTube videos. It took me two days to finally figure it out. The reason is that  the videos and the manual say that this machine doesn’t need weights. It comes with a pair of tools called “strippers” which are attached to each side of the main carriage. Its job is to push down the stitches when the carriage is passing over the needles to prevent them from creeping up and  drop the stitches. Well, it didn’t work for me. So I went to get my Brother’s weights and as soon as I hung them, it worked like a charm.


 I’m used to Japanese knitting machines, but this machine works differently. If I would’ve looked at it with fresh eyes, I probably would’ve learned how to use it faster. I had to figure out some tricks, but when I finally did, a new world opened up for me. This machine is a veritable beauty. It knits in the round and it does ribbing since it’s a double bed machine, no additional attachment needed! I knitted my first test, a baby sweater.

The Baby Ranglan, pattern by Bernadette A Ernakovich
The Passap Handbook: Beginner Course
My 1950’s Doll Savannah

Here are some of the advantages:

  • 1. Doesn’t need a ribber
  • 2. Knits in the round
  • 3. No need for extra carriages
  • 4. Uses punch cards
  • 5. There are many optional accessories like, Passap form, Passap form computer, four color changer, Jaq 40, etc.

There are some  disadvantages though:

  • 1. It’s big and not portable by any stretch of the imagination
  • 2. It’s old, and although there are some spare parts for sale on eBay, they are scarce and expensive (the gears used to rack the beds don’t work, I am using a screwdriver instead)
  • 3. The machine itself, if found in good shape, is expensive
  • 4. It is a standard machine (4 mm st size) which means it works mostly with thin industrial , fingering or lace yarns

Nevertheless, I am in love with my “gentle giant” knitting machine. Right now it’s  my living room, to my husband’s chagrin, but I plan to find a nice place for it (someday). My next goal is to master the punch card mechanism and learn to use the form computer. Wish me luck. In the meantime, knit your brains out!

Savannah


GOODBYE TO 2018 AND HAPPY NEW KNITTING YEAR!

GOODBYE TO 2018 

Another year ends, 2018 was full of projects and lots and lots of knitting. However, I didn’t achieve nearly as much as I wished. In fact, it looks like I have less and less time each year. Life gets in the way, but I refuse to let it be that way.

I have many plans for 2019 which include the use of yarn. I want to make an effort to use my yarn stash instead of having it stored  in one of my closets. I want to use each of the knitting machines I have collected so far since I don’t believe in keeping things that won’t be used. I also want to focus my yarn efforts on helping. I want to donate my creations to any charity that might need them.

This year has been full of changes and challenges, I became a vegetarian and I plan to become a vegan. This has been particularly difficult, but no sacrifice is enough to save a living creature. I don’t believe animals were put on this earth for us to use and abuse and that includes animal byproducts like leather, milk and cheese. I also refuse to use natural fibers that come from animals, imprisoned, mistreated and tortured like in the case of wool.  Suffering isn’t right, no matter the species. This will be the year of recycling!

That being said, below are my favorite 2018 pictures, which  predominantly feature my beloved pets and knitting/crocheting QA team, my kitties.

Goodbye 2018 and Welcome 2019! Happy  New  Knitting Year!

Puff Bootsy

Forever Socks!

Double Pointed Needles Challenge

Chloe Proudly Posing Next to XMAS Tree (Featuring granny squares decorations)

Gypsy’s Happy Place with Mommy and her Knitting

My New Toy, Passap Duo 80

You Can’t Never Have Too Many Bags

Knitmaster 2018

Vintage Simpleframe Knitting

SIMPLEFRAME KNITTER

A while ago I found a collectible knitting machine. The Simpleframe knitting machine model S100.  It was made in the UK. I found a YouTube video of the first Simpleframe machine created. It was invented by Dr. P.J. Reilly, and it was a long triangle that you could put on your lap. I have never seen anything like it. It is simply brilliant! 

I made a lap blanket, and I was surprised at how easy it was. So, I decided to make a scarf and take some pictures. I will post a YouTube video on my channel with all the steps. 

https://youtu.be/e9b2b_1-2zQ

It takes practice to learn how to use the knitter. The tension of the yarn is probably the hardest thing to learn since there are two wooden latches on each side of the frame that hold the yarn and that have a screw that you can tighten or loosen to control the tension. You have to keep trying to get the right tension. 

The tension rod is not that easy to use either. It consists of a metal rod held by two loops attached to a gear that turns to roll up the fabric. This is a substitute for claw weights in regular knitting machines. When the piece is too long the gear doesn’t turn, so you have to turn the gear in the opposite direction to let the work free, then you settle the metal rod higher, so you start to tighten the work again.

Here are some pictures.

The Simpleframe Handbook

Tension Rod


Below is a picture of the lap blanket I knitted on the Simpleframe. As you can see my Kitty Quality Control Team approved. Success!


Kitty QA Team Approved Finished Product
I absolutely love this machine. It is not fancy, has no bells and whistles, but gets the job done. It is light, and it comes with a bag so you can carry it wherever you go. As you can see in the pictures, I was working on a little foldable table while watching TV. 

The name of the company that made this knitter was Frame Knitting Ltd., in Oakham, England. The company closed in 2009. It saddens me to think that these beautiful machines are not made any longer.

I will keep collecting them and showing them with the hope, someday, they will return. 

Machine Knitted Top

Machine Knitted Veronika Top

I finally could figure out how to use my electronic Brother knitting machine. Since I forget everything and I don’t feel like reading the manual every time I use this machine, I recorded a video of how to use the pattern feature and posted it on YouTube. Then, I had to figure out what to do with that knowledge.

So I decided to design a top. The top is sleeveless which means it can be used over a long sleeve shirt in winter and over a short sleeve t-shirt in spring and fall.

A couple of people asked me about the pattern. This threw me into a panic attack since I have never written patterns that aren’t meant for my eyes only. The first problem I encountered was how to write the instructions to use the pattern feature on this particular machine. That alone would have taken three pages, and who wants to read a pattern that is longer than three pages? So, I decided to include the link to the YouTube video I created in the pattern.

The second problem was that I kind of cheated. My machine is a standard gauge which means that the distance between each needle is 4.5mm. This is a very small gauge, so it is difficult to assemble the finished product. That being said, typical me always avoiding the extra work, I decided to finish with a boat neck, but I didn’t shape it at the shoulders. Instead, I knitted evenly to the end (no decreases). I knitted extra rows in order to fold the extra fabric to create the neckband.

 After blocking the pieces, I folded the neckband and pinned all the pieces together making sure I pinned the shape of the shoulders. This left me with extra fabric at each shoulder. I sew the pieces on my vintage singer sewing machine (circa 1960’s, a real workhorse).

After I finished sewing the top, I cut the excess of fabric at the shoulders and neck with a pair of sharp scissors. That is probably one of the scariest things I have ever done!

Since I am not sure if all knitters know how to use a sewing machine or even if they own one, I got to work on writing the pattern with shaping at the shoulders and neck. The result was almost the same with the difference that on the original design the neckband looks thicker and on the second one I finished the neck with two single crochet rounds (to avoid the curling of the fabric).

Below is the link to the pattern. I hope someone finds it useful and forgives any mistakes I might have made when writing it. It is my first public written pattern and it was harder to write than I anticipated. 
YAY!